How to Make a Website: 3 Easy Step-by-Step Instructions
You don’t need to be intimidated by the internet. It’s merely a collection of interconnected websites, and websites are actually very simple things. They are files that people can access through Internet Browsers such as Internet Explorer, Mozilla Firefox, or Google Chrome. See? It’s not so scary when you break it down to its simplest elements.
You will need to do 3 things to make a website and publish it online: Create your Website Files, Purchase Web Hosting Space and Register a Domain Name, and Upload Your Files to a Web Server.
1) Create Your Website Files
The website files are what visitors see when they visit your website. Basic websites are constructed with HTML code, but if you don’t know how to code HTML, there are programs that build websites in an environment similar to word processors (I.E Microsoft Word) and can generate your HTML files for you. Adobe Dreamweaver is a popular program, but if you’re looking for a free solution, Mozilla has a free HTML editor named SeaMonkey. (You can use any program you want, these are just recommendations.)
Download and install the SeaMonkey program on your computer, then open the program.
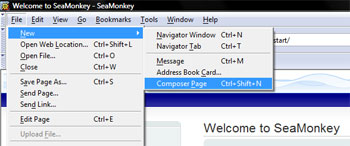
In the SeaMonkey program, go to File > New > Composer Page.
This is where you can build your web page. Once you’re finished with a page, make sure to save it. It will automatically save as an HTML document, with the file extension “.html”.
Great! You’ve now created your website files, and they’re saved on your computer. Now you need to find a company to host your files on the internet.
2) Purchase Web Hosting Space and Register a Domain Name
A Domain Name is a name that will point to your website, such as “example.com” or “example.net”. Web hosting companies have servers that specialize in storing websites for people to access over the internet. Purchase some web hosting space from a company that offers the domain name as well, because it will greatly simplify the process. Some hosts even offer free domain name registration with the purchase of web hosting space.
Once you’ve purchased hosting space and a domain name, make sure to ask the company for your “FTP connection information” so that you can move on to step 3.
3) Upload Your Files to Your Web Server
In order to upload the website files that you created in step 1 to the web hosting server space that you purchased in step 2, we’re going to use something called an FTP program. There is a great, free program called Filezilla (made by the brains behind the Firefox web browser), and you can download it here: Download Filezilla
Download the appropriate file depending on your operating system, install Filezilla on your computer, and open up the program.
In order to connect to your web server, you’ll need the following information, available from your web host: FTP Hostname, User Name, and Password. You can enter this information into the fields at the top of the Filezilla program and click “quick connect”. You should now be connected to your web server.

Connecting to your Web Server
Once you’ve connected, you can use the left window pane to navigate your computer’s files, and you can upload files from your computer to the webserver. Ask your web host which directory contains your website files. You will upload the HTML files that you created on your computer onto the webserver, into that specific directory.
Now, try visiting your domain name in a web browser. You’re on the web! Do you see? Publishing a website onto the internet is easy. Making a website that looks good? Now that is a different story.
Posted in: How To, Quick Tips, Tech Support, Web Design, Web Design Resource, Web Hosting, WWW Learning Center
Latest & Greatest
- Customer Retention: A Comprehensive Guide to Retaining Your Customers
- Top Reasons Why Web Designs Don’t Launch
- Your Website is About Them, Not You: Digital Customer Experience
- Google Business Profile 101: How to Use it & SEO Benefits for Your Local Business
- The Power of Intentional Website Branding
- Competitive SEO Analysis: How to Keep an Eye On the Competition from an SEO Texas Agency
- Optimizing Your Online Registration Design for Better User Engagement
