Cool Things with Gravity Forms: Make A Quote Calculator Form

Sometimes I have the pleasure of working with one of my favorite plugins for WordPress, Gravity Forms. In my opinion, Gravity Forms is a form-building plugin superior to most plugins out there. With the tools available in the base plugin, it is possible to create many different types of forms.
In this issue, I will explain how to use Gravity Forms to create a calculator form. Let’s dig in.
What kind of reasons could you have to make a calculator form?
Ok, so you could have stumbled on this article because you had a burning desire to calculate something and needed some instructions, “stat”. Or maybe you are just wondering, “What is a calculator form?”
When I mention calculator form, I am referring to anything that might use some logic and numbers to calculate some kind of result for the website user.
Here are some examples of dynamic web forms that involve calculations:
- A quick quote form: A form that will give the user a quick automated estimate for your service or product without needing to call a human.
- A savings calculator: A form that will show the user what kind of money they could be saving with your product vs. a compared average cost.
- A comparison calculation: A form that will show the user how their own numbers compare to other values (maybe industry values).
- A dynamic visualization of something that tells a story: A form that illustrates the impact of some kind of data, usually based on some actions the user is taking and how that impacts the world.
For today’s little help guide, I will focus on creating a quote form.
Before we start, I am assuming you have already purchased your license and installed Gravity Forms on your WordPress site.
How to Make a Quick Quote Form
The goal is to create a form that can provide a potential customer with a quick automated estimate.
Don’t worry, giving up this estimate doesn’t mean it is not a valuable lead generation form. In fact, your estimate might entice the user with just enough information to pique their interest. And, you can still receive information about the user to follow up.
Step 1. Create a basic form in Gravity Forms.
Go to Forms > New Form.
Start building a simple form and give it a name. Let’s call it Quote Calculator.
Add the basic fields to the form for name and email address, and any other minimum fields you need. You should require name and email address, if you intend to have any way to verify and track the requestor. The latest version of Gravity Forms allows you to drag and drop fields to your form dashboard. If you aren’t already familiar with the basics of using Gravity Forms, visit their documentation here.
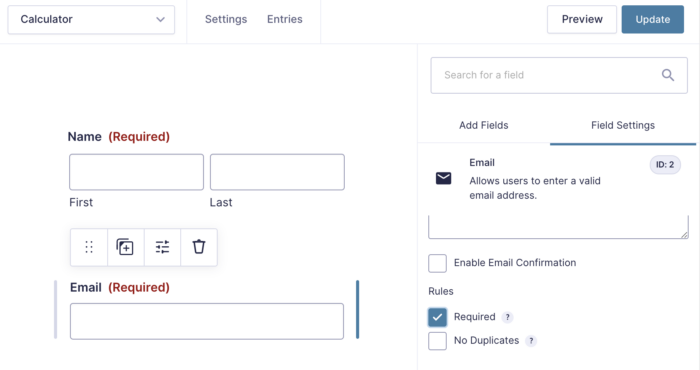
Pictured: Add the standard fields to get your form started.
(Some companies decide not to ask for email if they have a compelling reason and are successful enough to gain the user’s info another way.)
You might have a few other fields you require, but let’s assume in this case we want to keep the number of questions short and sweet, to put less pressure on the prospect.
Step 2. Add the quote calculator logic.
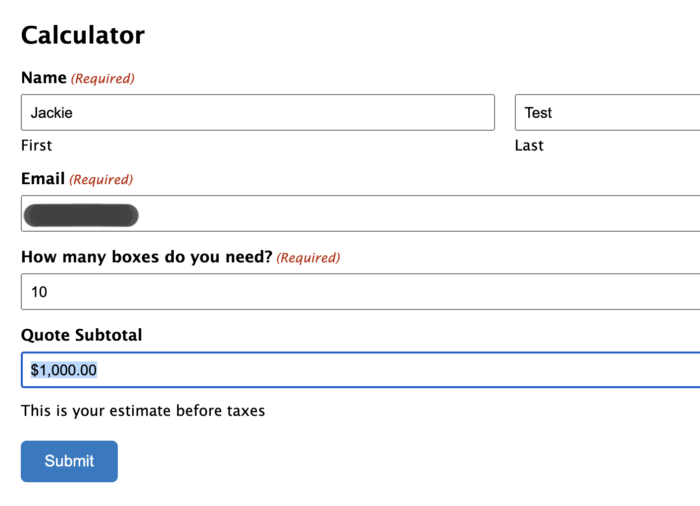
In this simple example, we only need three number fields: a field the user will input, a price value, and a subtotal.
Insert the first field for the number that the user will type in to influence the quote. The type of field you select should be Number. For example, the number of boxes of your product they want to buy, or the square feet size of a room. You probably want to make that field required if you need it to calculate the result.
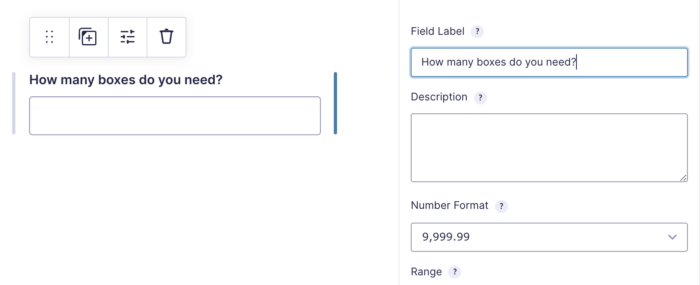
Pictured: Add a number field for the user to define their needs.
Next, add another number field, and label it as the price of your service or product. Again, we are making a very simple example here, so there is only one product with one price. Under Advanced settings for this field, you want to input the Default Value as the price of the item. And you want to set Visibility to Hidden. I used $100 for my example price.
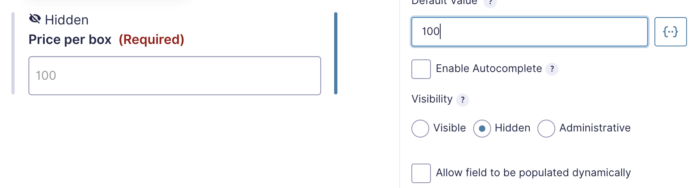
Pictured: Using a hidden number field to define a price.
Now, add the 3rd number field. This will be your subtotal for the quote. I describe it as a subtotal instead of a total because I suspect this is just an estimate and may not include all the taxes and fees someone needs to follow up on. You can label it whatever you prefer.
This is where things get fun. You need to select the option to Enable Calculations on this field. Then, use the merge tags from the dropdown select option to insert the field name for the user input (eg: How many boxes…) multiplied by (* button) the field name for the price.
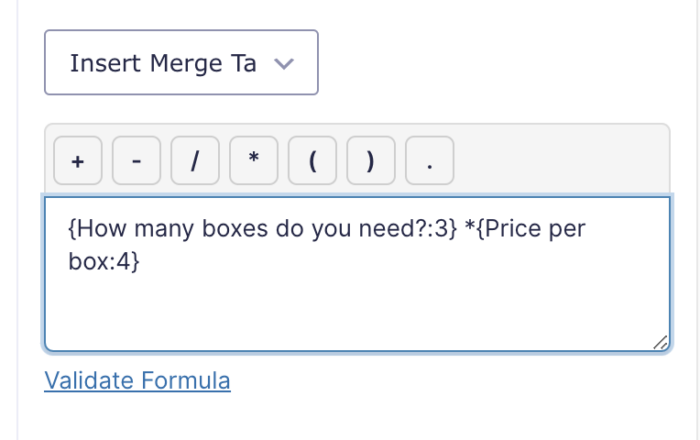
Pictured: Calculator form field merging a subtotal calculation.
Save all the settings.
Go to the Preview button in Gravity Forms to test out your form and confirm the calculation is working.
Step 3. Setup confirmation.
Go to Settings > Confirmations.
You can pick the default “text” option if you want to just display a simple message on the same screen. For a better UI and tracking, you probably will want to make a Page in WordPress that you can link to. For now, I will show a simple way to insert merge tags into your confirmation message. This will display the subtotal from the quick quote in the message, for a more personalized confirmation.
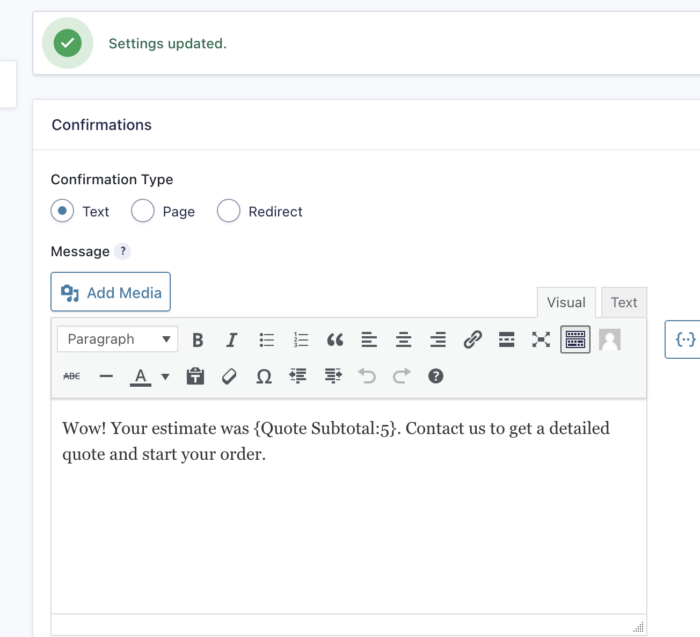
When you type your message into the box, click on the icon at the far right to select and insert merge tags. I only selected the Quote Subtotal in this example.
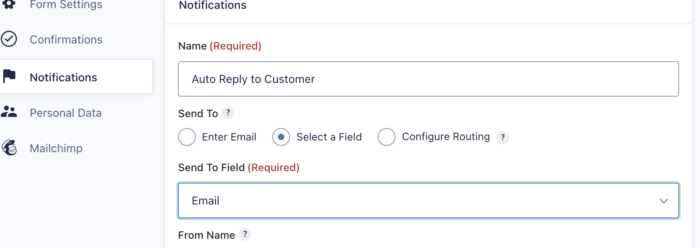
Step 4. Setup form notifications.
Gravity Forms enables a default notification for the Admin. You can add another notification for the prospect to receive.
Go to Settings > Notifications.
Add a new notification, and name it something (for example: Customer Auto-reply).
Select Field for the recipient and select the required Email field you made earlier. This will get this message to the person who requested it, assuming the email is valid.
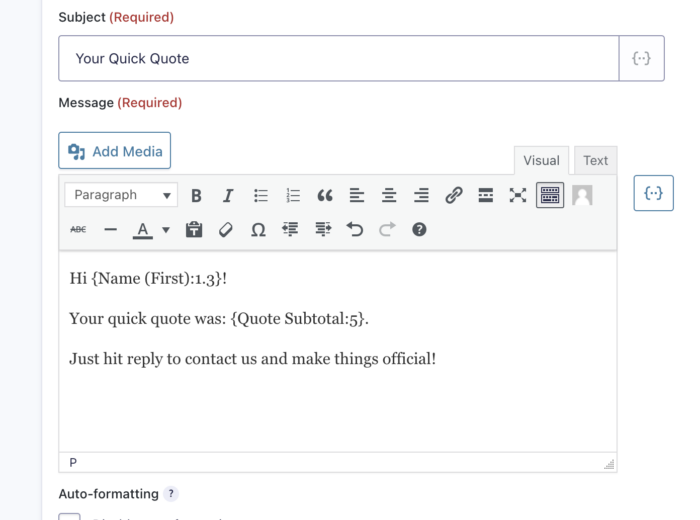
Fill out the other fields like the subject and preferences, and fill out the body with some text. Personalize the body with merge tags to customize it with the info from their quote.
Pictured: Gravity Forms email notification settings
Pictured: Gravity Forms notification for user
Step 5. You’re ready to get some quotes! Embed and test the form.
Find the Page in your WordPress site that you want to use to entice visitors with, and insert the new form to the page, using the handy Add Form button in the classic editor, or the Form block in the block editor.
Gravity Forms is capable of building more complex calculator options, and you can even build tiers of calculated fields that provide very interesting results. In our latest and greatest Gravity Forms blog post, we even teach you how to make an effective quiz. And have fun exploring the opportunities of quote forms!
Let our team help you create super neat effective forms that convert.
Want to save time and take advantage of our expertise? Chat with me!
Managing Director
Posted in: How To, Internet Marketing, Small Business, Tech Support, Web Design Resource, Web Development, WordPress web design, WWW Learning Center
Latest & Greatest
- The Evolution of Driving Schools From Classroom Instruction to Mobile-First E-Learning Apps
- How to Write Website Copy That Helps You Rank on Google
- Different Ways to Insert a Contact Form on Your Website
- From Contact Forms to Conversational AI: The Evolution of Website Communication
- How Many Plugins Should a WordPress Site Have?
- How to Prepare Your Website Content
- How to Fix Common Website Bugs