Cool Things with Gravity Forms: Make a Quiz

We’re back to explore the capabilities of the popular WordPress plugin Gravity Forms. As you may already know from my past tutorials, Gravity Forms is one of my favorite tools to “nerd out” with. In this walk through, you will see how we can align the Quiz Add-On to create gamification-style content.
Making Purposeful Quiz Forms for Your Website
A simple quiz can be helpful in a variety of ways. One example is as a prospect-focused form, that asks a series of questions to pre-qualify the visitor. Another example is for onboarding existing customers, asking them some meaningful input that will allow you to move their account to the next step quickly. This approach is helpful for services that involve consulting and customization. In my example here, I am using a quiz for a fun content marketing idea that will engage visitors on my website and be shareable on social media.
Spoiler alert: My quiz supports conditional confirmation content!
Preparing Your Quiz Content
Before you start building the actual form, I recommend preparing a document that outlines each question and answer choice.
Make clear notes on how many points each answer scores (if points are involved) or which option is the correct answer. There is an optional field to support a written explanation about the correct answer, so if you want to add that additional answer explanation in the final results, have it written up as well.
My marketing quiz did not have a single correct answer, so as I prepared my content document I noted the amount of points for each answer choice. I then had to determine how many total points you needed to achieve for a certain result. Since my quiz has more than one result, I wrote out five different possible responses a user could get, and what range of points is required for each response.
Creating the Quiz Form
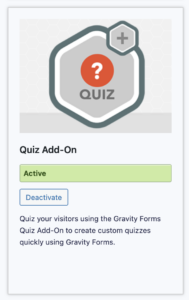
Step 1: Enable the Quiz Add-on.
I am assuming that you already have a license for Gravity Forms with the Quiz Add-On available in your plugin. In your WordPress admin, look under Forms > Add-Ons. You should see the Quiz option there, where you can click to install it. It usually takes a few seconds to install, and then you can activate it.
Step 2: Create a new form and add the basic fields you want to collect from the user.
![]()

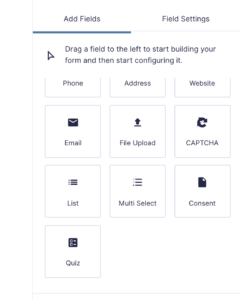
Step 3: Add quiz fields.
Since you enabled the Quiz Add-On, you should have access to a new field type called Quiz. You will find it under Advanced Fields. Drag the Quiz field over to your form to start making a question-answer set. It offers options for radio buttons and other styles. I used radio buttons, since mine is multiple choice with a variety of “right” answers.
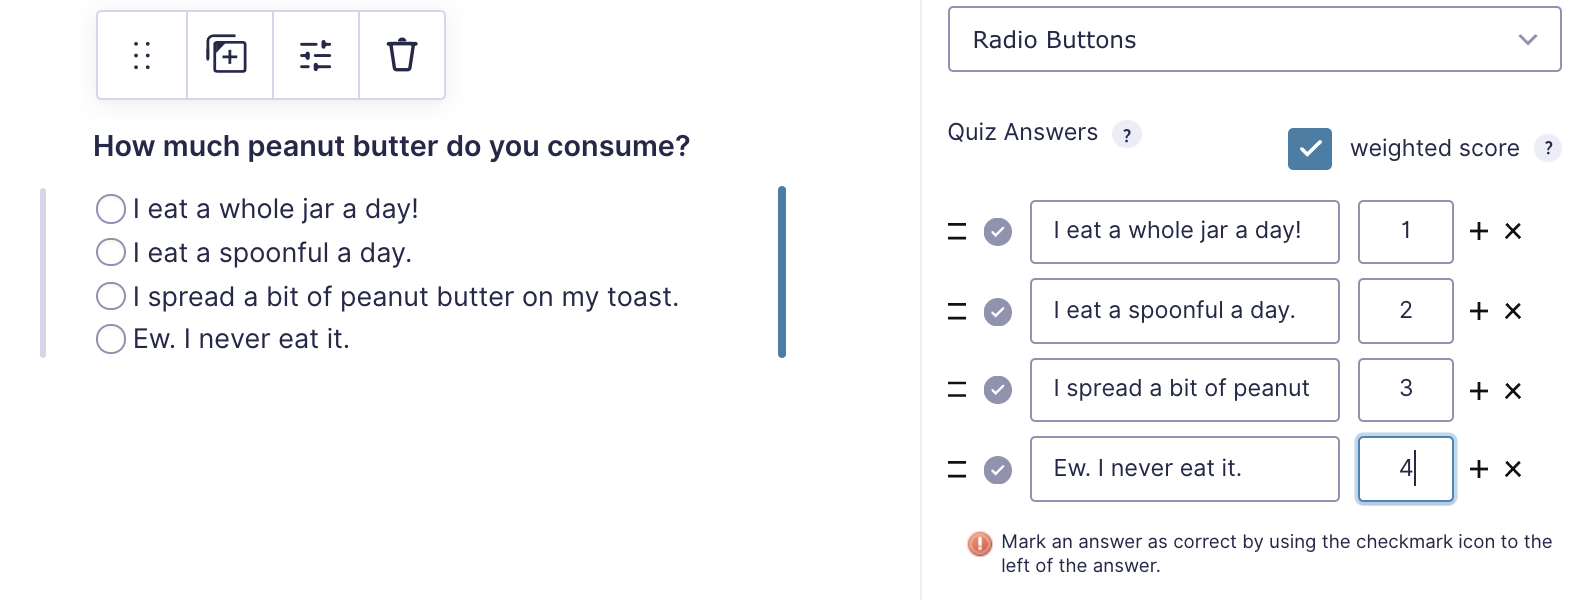
Step 4: Configure the details for answers and scoring.
Here is where your document comes in handy. Use it as a reference or even copy and paste text for questions to your new fields. Since everything is worked out in your doc, the data entry will go faster with less chance of mistakes.
Customize each question, each answer choice, and use the settings options to define a number of points for each answer (if applicable) or define which single answer is the correct one. For points, you need to check the box for weighted score. My quiz had no single correct answer, so I simply did not use the correct answer option. But it was very important for me to define the number of points for each answer properly, so that my final results can be calculated and show the website visitors their “score”.
Repeat the step of adding more quiz questions, until you have your whole test ready to go. Don’t forget to save the form often, because it can be a lot of work to re-edit all the fields!
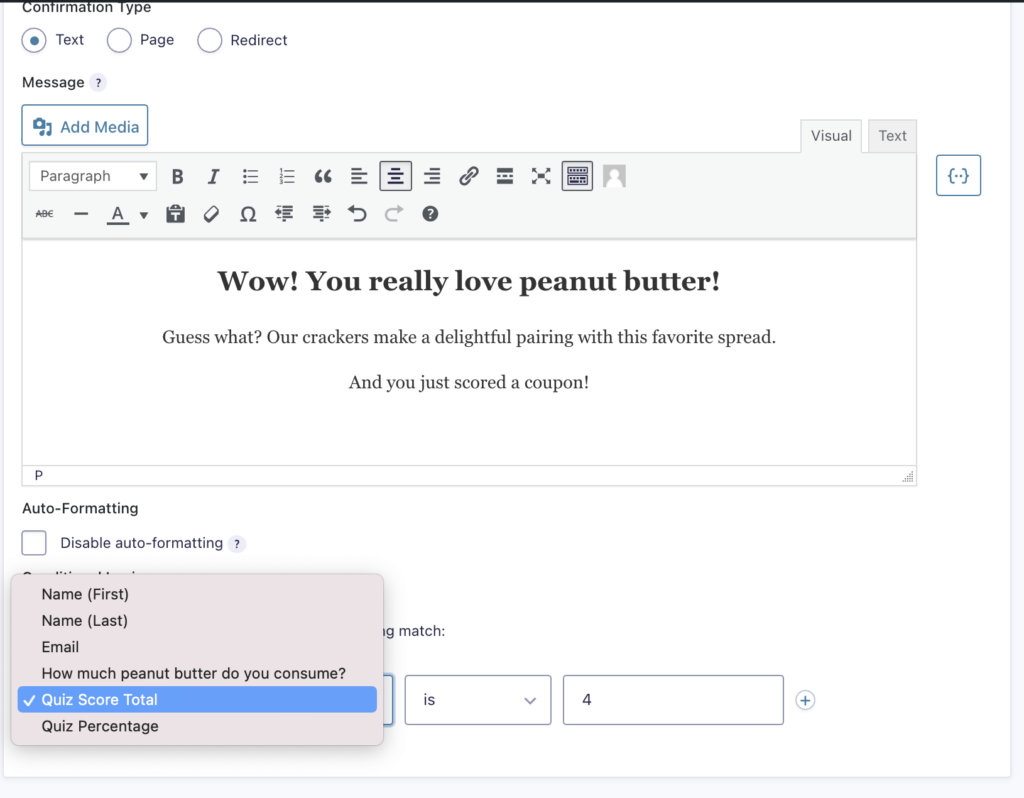
Step 5: Customize your confirmation messages (and conditional options).
This was the fun part of creating my marketing quiz. Instead of just one default confirmation message that tells the user the form is complete, I made five different possible confirmations. Many people don’t realize there is a conditional option in confirmation messages. And when you have the quiz option, one of the conditional choices is Quiz Total.
FYI – you can’t really do a conditional on the default confirmation. You will need to create a new confirmation. And I suggest keeping the default confirmation with something generic, just in case your quiz is a little off on the scoring and you need a result for those who didn’t get the customized answer you thought they would get.
Step 6: Customize the notification.
Remember to check your Notification settings for the form and make sure the admin notification is setup the way you want. You can also create a notification for the user who is submitting the quiz, but only if you are collecting their valid email address during the quiz. Sometimes I elect not to do this, to prevent too many bounces from invalid emails and spammers testing my form.
Step 7: Preview and test the form.
After saving all of these options, use the Preview function in the form first to test it out. This gives you a simple look at how it is working, without pretty design from your theme around it. It will help you to make some quick fixes on typos in your answers and make sure the confirmation result is correct.
Step 8: Add the form to a real web page.
Now it’s time to add your new form to a page and start promoting it! Locate the page under Pages in WordPress and go to edit it as usual, and use the Insert Form button (Classic) or Gravity Form block (Block Editor). Update and publish the page, and do some more testing to ensure it still works well with your design theme.
Extra Tips for Personalizing Your Form
There are a variety of neat Gravity Forms field options that you can add to customize the experience of the quiz-taker. For example, in my quiz I used the Page feature to paginate my form into steps, so it felt a little more like a quick step-by-step wizard or app experience. I also used conditionals in a few of my questions to avoid asking too many details to a user who answered “no” to something else. If you are comfortable with CSS or have a web designer you lean on, I also recommend customizing the look and feel of the form so it is nicely integrated with your website theme. It’s fun to see a form transform with your unique fonts, colors and field borders.
Let our team help you build dynamic forms that attract leads and convert.
Chat with me to find out what your website can do!
Managing Director
Posted in: Content Marketing, How To, Quick Tips, Small Business, Web Development, WWW Learning Center
Latest & Greatest
- The Evolution of Driving Schools From Classroom Instruction to Mobile-First E-Learning Apps
- How to Write Website Copy That Helps You Rank on Google
- Different Ways to Insert a Contact Form on Your Website
- From Contact Forms to Conversational AI: The Evolution of Website Communication
- How Many Plugins Should a WordPress Site Have?
- How to Prepare Your Website Content
- How to Fix Common Website Bugs